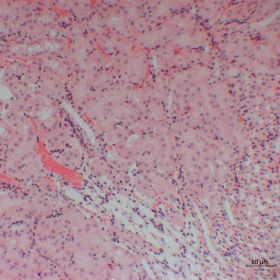
In the previous articles we looked at tissue preparation, sectioning and making slides. Now that you have slides ready for use, the next stage is immunohistochemistry or staining.
One of the most commonly used stains for examining tissue is haematoxylin and eosin (or H&E). This is another of those lab techniques which can easily be taken for granted, however, if you understand the science, the materials and the method, this should help you achieve optimal results every time you stain. In this article we’ll take a brief look at the history of the technique followed by the solutions used (and the materials needed for each one to help you set up your own H&E station) and finally, the method itself.
A tree and a girl: a bit of history
The origins of haematoxylin date back to the 17th Century. This dye is actually named after the tree from which it is extracted: Haematoxylum campechianum. A native tree of Mexico and Central America, this logwood was exported to Europe for use in fabric dyeing. In 1863, a German anatomist called Heinrich Wilhelm Gottfried von Waldeyer-Hartz (or ‘Waldeyer’ for short) published the first article in which he had been experimenting in the use of haematoxylin as a histochemical dye (he was also credited as naming the ‘chromosome’). However, these initial results were poor and it wasn’t until 1865 when Böhmer realised that the extracted dye needed to be combined with a ‘mordant’ to facilitate the staining of tissue. A ‘mordant’ is simply a metallic salt which helps the dye bind to tissue, the most commonly used are aluminium and iron. Independently of Böhmer, Heinrich Caro was a Polish chemist working for the chemical company which later became BASF. Working with a sample of fluorescein, Caro synthesised a yellow-red dye which he named ‘Eosin’ (after the nickname of a girl he admired!). Emil Fischer was another German chemist working in the field and in 1875 he published a paper on Eosin Y which is the commonly used eosin dye in histology. The ‘Y’ stands for ‘yellowish! Skip forward a year and Wissowzky published his work on a combined staining using both haematoxylin and eosin.
Haematoxylin
The haematoxylin which is extracted from the wood is not actually a very good histological dye in itself. It needs to be oxidised to ‘haematein’. Even then, this dye is not directly used in histology. This is where the mordant comes in. This metal cation enables the haematoxylin to bind to the nuclear proteins (specifically the histones). You may come across the term ‘haematoxylin lake’, but this doesn’t refer to some vast expanse of liquid! This term just means a solution of haematoxylin and metal salt with some additional chemicals.
Eosin Y
Eosin Y is an anionic acidic dye which binds to positively charged components of the cytoplasm such as amino groups. This counterstain helps to differentiate between the nucleus and non-nuclear components in cells. Even though the ‘Y’ stands for ‘yellowish’, the stain is actually pink. Another type of eosin is ‘eosin B’. The ‘B’ stands for ‘blueish’!
Make your own H&E workstation
If you don’t have access to a dedicated histology lab (and are planning to carry out a number of H&E stainings), then it’s advisable to set up an H&E workstation.
Remember that most of these chemicals are toxic and/or harmful. Use PPE when handling/storing, follow SOP’s in your own institute and use COSHH and MSDS forms which come with each of them.
The four main solutions you’ll need are as follows;
(1) Harris’ Haematoxylin Solution.
Haematoxylin 2.5g
Ethanol 25g
Potassium alum (the 'mordant') 50g
Deionised water 500ml
Sodium iodate 0.5g
Acetic acid (glacial) 20ml
As stated above, haematoxylin needs to be oxidized to become the functional dye haematein. In this method, this is achieved by sodium iodate. The haematein then binds to the mordant (potassium alum) which allows the dye to bind to nuclear material.
To make the solution, dissolve the haematoxylin in ethanol. In addition, dissolve the potassium alum in 500 ml of warm deionised water in a two litre flask. Add these two solutions together.
Bring the resulting solution to the boil and carefully and slowly add the sodium iodate. Cool rapidly by plunging the flask into cold water or into a sink containing ice. Once cold, add the acetic acid and the stain is ready for use. The acetic acid is optional, but gives more precise and selective staining of nuclei.
Filter before use and use within two weeks.
(2) Acid Alcohol.
Hydrochloric acid, concentrated (sp.gr.1.19) 1 ml
70% ethanol 99 ml
(3) Scotts Tap Water.
Sodium bicarbonate 2 g
Magnesium sulphate 20 g
Deionised water 1 litre
Dissolve the salts in the water and store stock solutions at room temperature.
(4) Eosin.
Eosin Y is made up as a 1 % (w/v) solution in dH20 (ie- 1 g of Eosin Y in 100 ml of water).
You can order Eosin Yellowish here (Cat. No. AGR1709);
Simple ready reckoner for the alcohol gradient;
95% ethanol
Ethanol (GP grade) 95 ml
Deionised water 5 ml
80% ethanol
Ethanol (GP grade) 80 ml
Deionised water 20 ml
70% ethanol
Ethanol (GP grade) 70 ml
Deionised water 30 ml
Haematoxylin solution can be bought as a ready-made solution, but depends how much of it you plan to use.
You should set up your workstation in a fume hood or a downflow bench as the first three steps involve immersing your slides in xylene to de-wax them. Ideally, the hood should be near a sink as you will also need some tap water rinses in between certain steps.
You will need 20 staining dishes for the workstation.
I would also recommend a few spare jars to transport the slides as you don’t want them to dry out at any point in the method.
In part two of this article, we’ll look at the method in detail as well as expected results and some top tips for troubleshooting.
Author: Martin Wilson


